
I can’t believe its November already. Does anyone else feel like this year has gone by in a blur? As the holiday season rapidly approaches I’ve been feeling the need to make the guest room up to par for any holiday guests stopping by this year. Having a guest room that helps invite people to make themselves at home really helps improve everyones experience as a traveler!
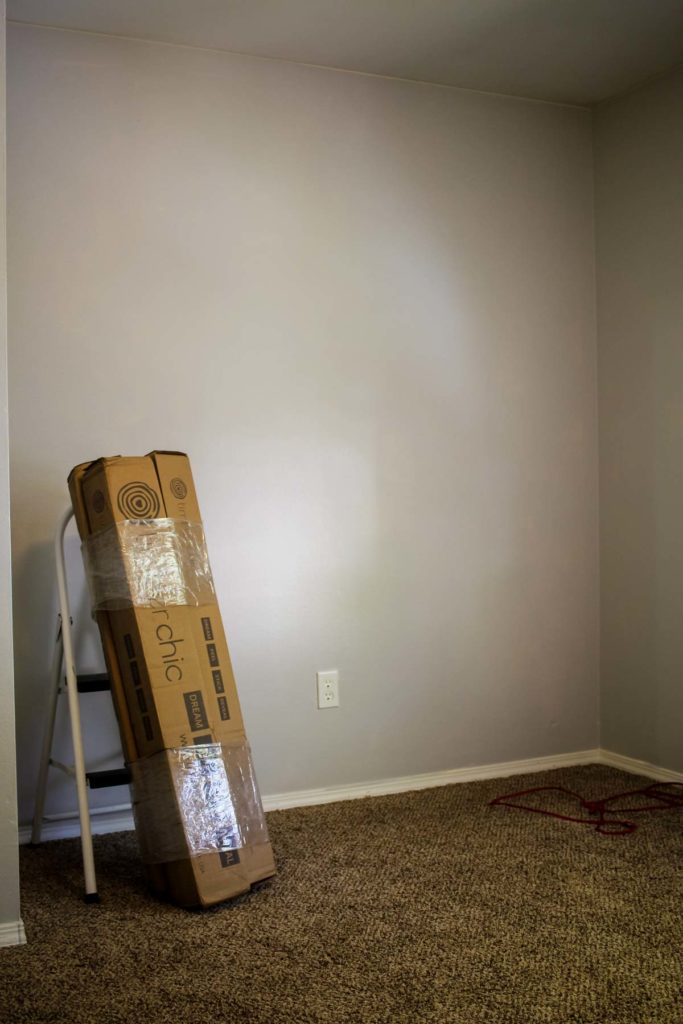
When we started, this guest room was a bit boring, just plain walls and a bed. The first step in revamping this room was to remove all the furniture and update the paint throughout the whole room. We used a light grey to give some color and depth.
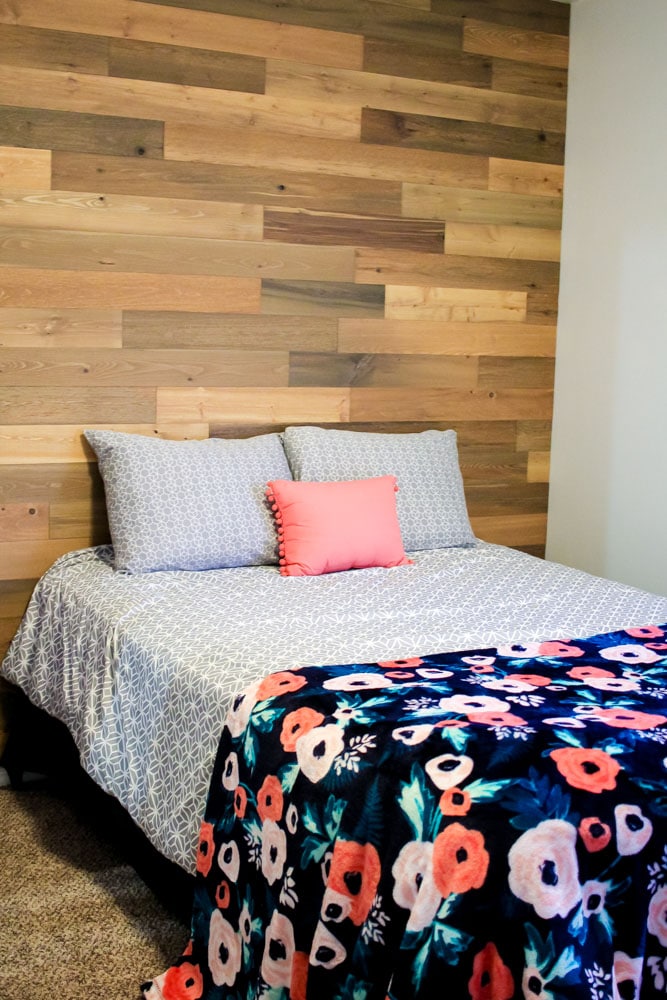
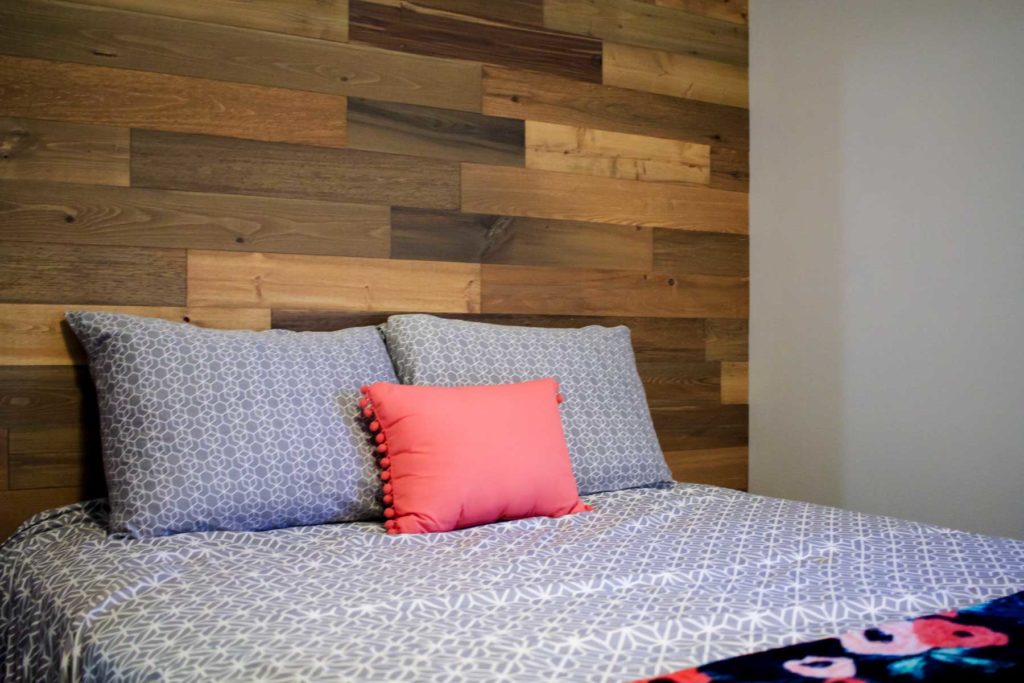
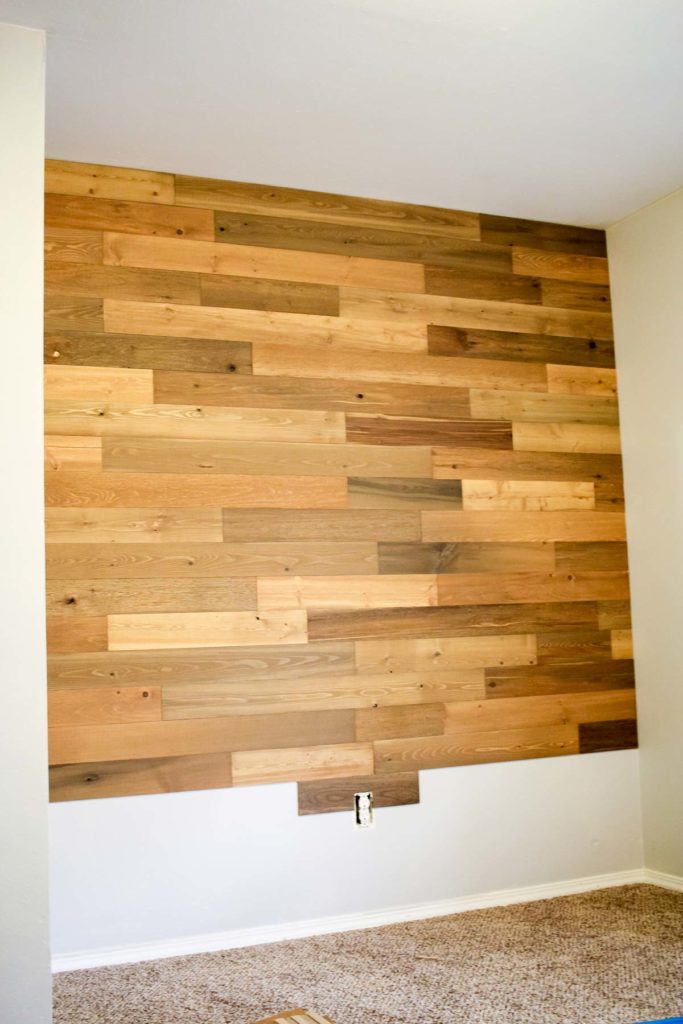
I’m in love with the look of reclaimed wood walls and I was super excited when I learned how easy timberchic® could make installing a reclaimed accent wall in this room. This beautiful DIY solution is made of reclaimed river logs and the smooth finish makes it perfect for installing as a headboard in the guest room.
 The full installation took approximately 6 hours, minus a trips to the store to get the right tools.
The reclaimed wood walls you see on HGTV are typically real 1″ x 4″ planks. Installing those would be super heavy and require a saw to make every cut, not to mention drilling each one into the wall.
This is what makes timberchic® so amazing! Each panel has been stripped down to a 1/4″ width making them lightweight to carry and instal. The panels come precut into a variety of sizes and are ready for quick installation by simply removing the adhesive strip backing from the wall side of each panel.
Step 1: Prep the Wall and check to ensure that it is level.
Luckily there wasn’t much we needed to do to prepare the walls other then remove the outlet faceplate. In Colorado (who knows maybe elsewhere too) houses settle, and sometimes walls get a bit off square.
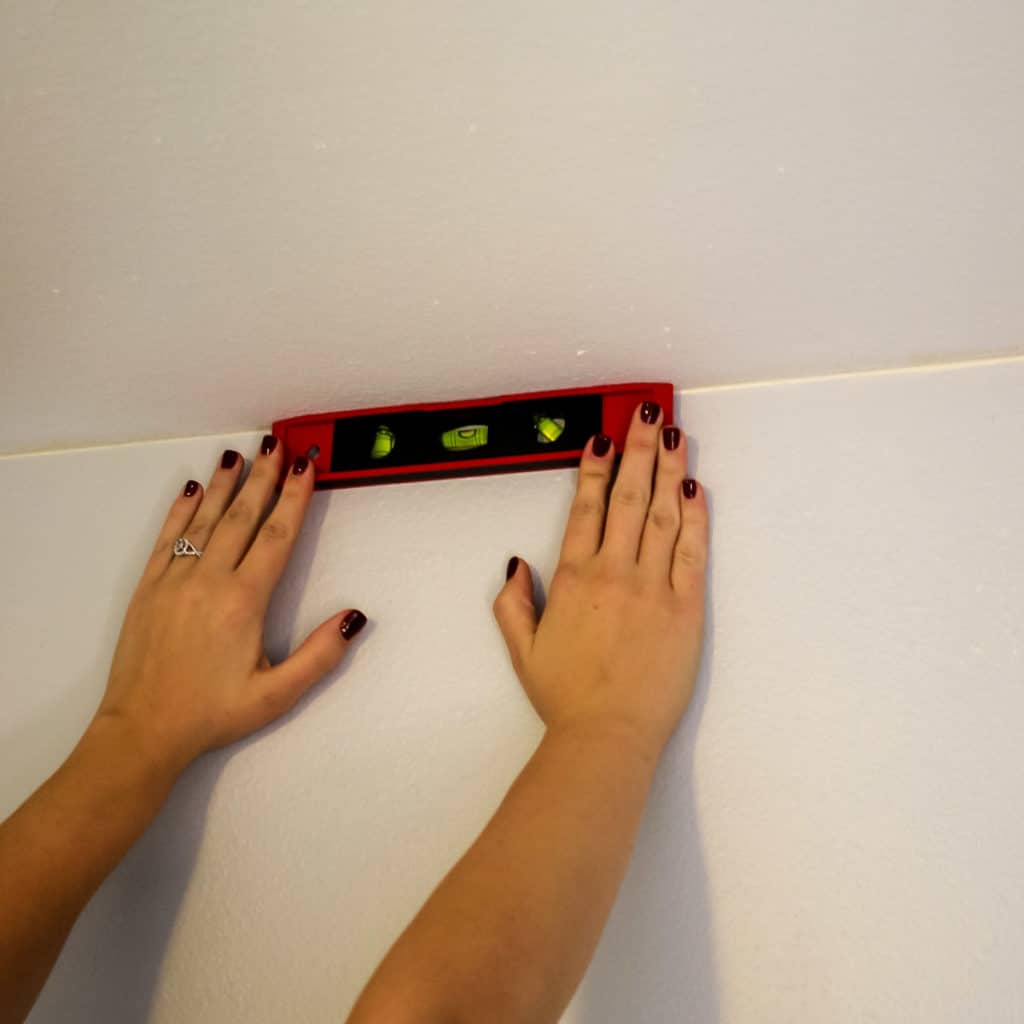
Its important to make sure that the ceiling and baseboard is level so that you don’t a have to worry about having a tilted pattern halfway down the wall.
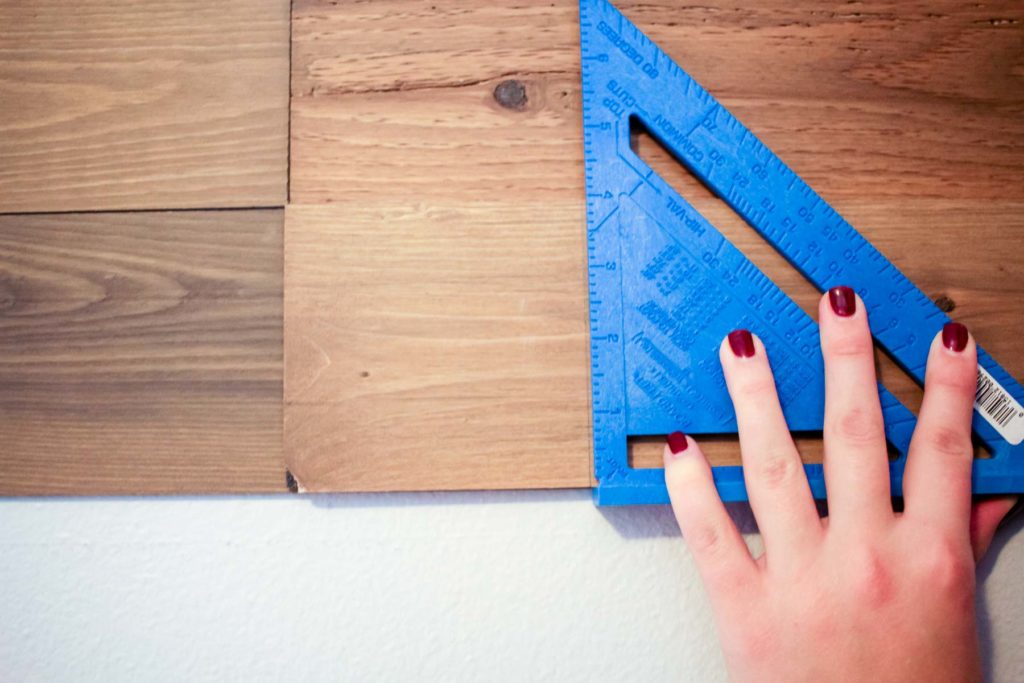
Step 2: Plan your layout
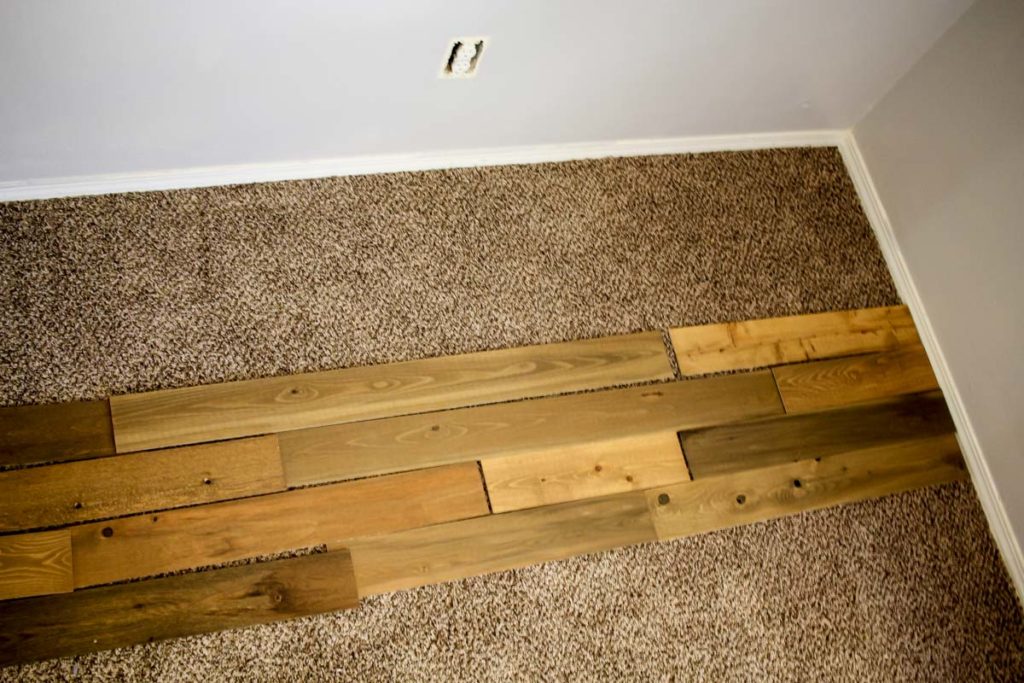
It would be impossible for the precut sizes to line up exactly, so we needed to plan to do some cuts to make everything fit properly in the space.
Step 3: Begin Installation
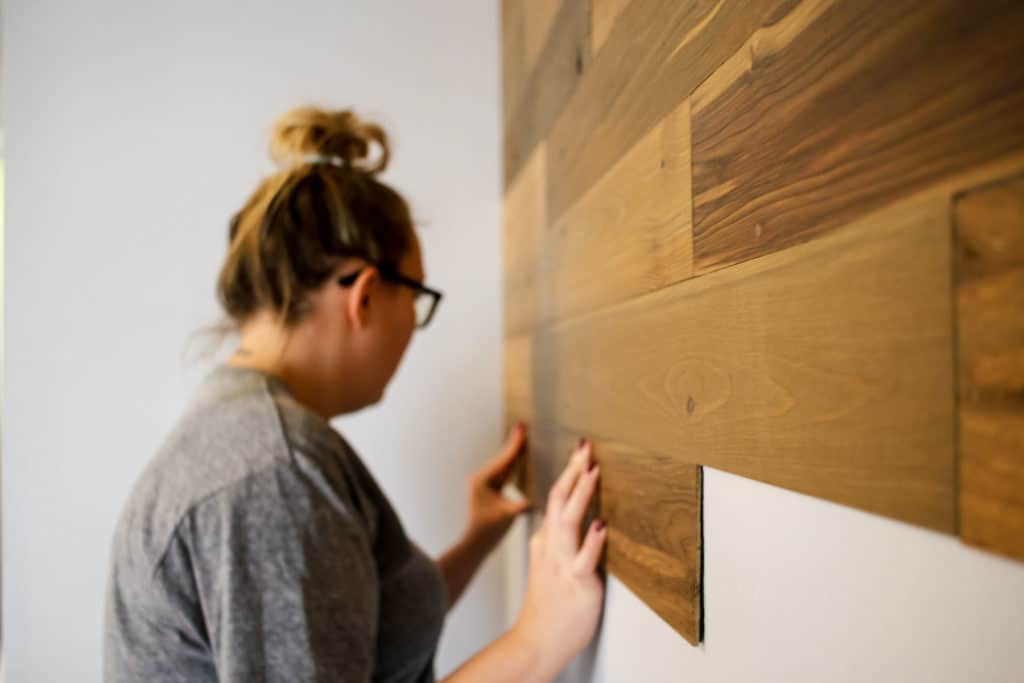

The adhesive backing on each strip made it easy to install each plank in minutes.Just line up against the board above it and press down firmly to adhere to the wall.
One important thing to be aware of is that these are REAL wood planks, so each one has its own character. Some planks have natural knots that need to be cleaned up as you go. timberchic® provides black stickers just for this purpose. You just stick a sticker on the wall where the knot will appear and it will create additional depth into your finished look!
Step 4: Cut planks as needed
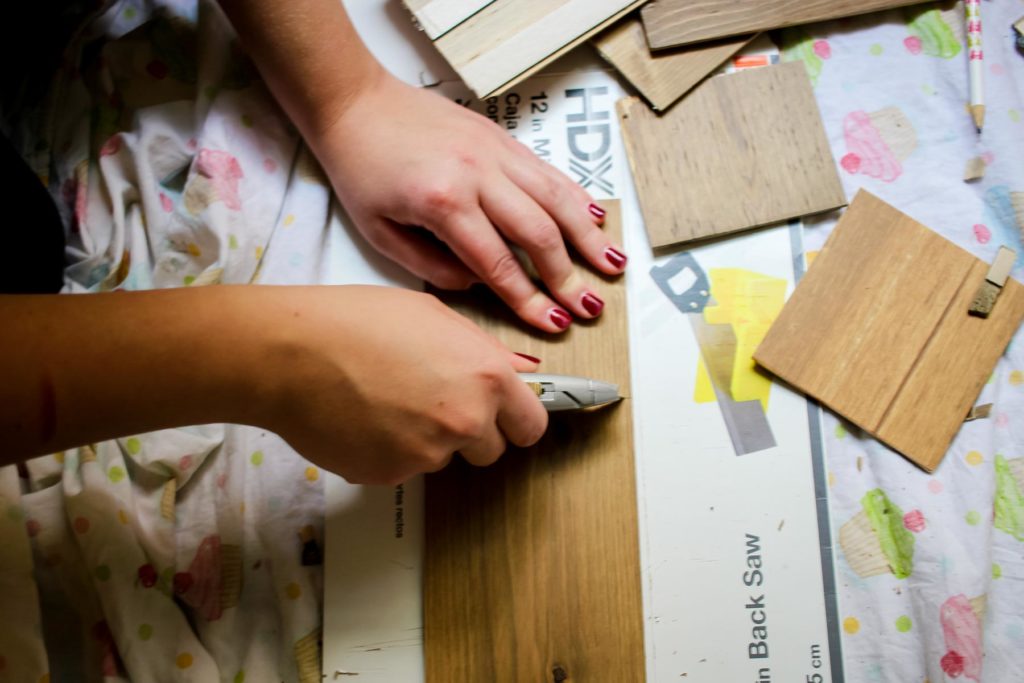
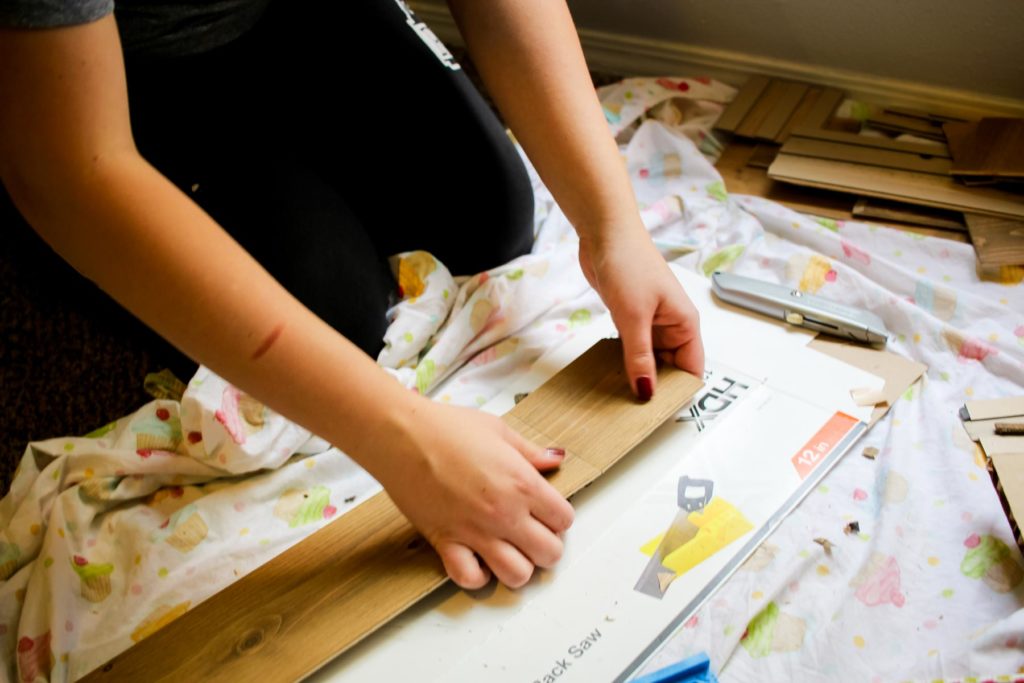
This was hands down the hardest part of this project. We initially to use a rotating saw but quickly discovered that it was unnecessary to use that much power to cut the strips. Next we picked up this handsaw and miter box and found that the miter box was just slightly too small for the planks. After a bit of trial and error, we found that a utility knife was the best way to cut each piece down to size. Just score firmly on each side and gently snap the wood apart.
Step 5: Cut around the outlet
Luckily we only had one outlet to worry about. Once we got to this row, we selected a medium sized plank to trace the outline of the outlet on and cut with the utility knife. We did end up breaking the first board we tried this with which is why ordering overage is SO important. Make sure you have enough extra boards that if you make mistakes you wont come up short at the bottom of the wall.
Step 6: Finish installation
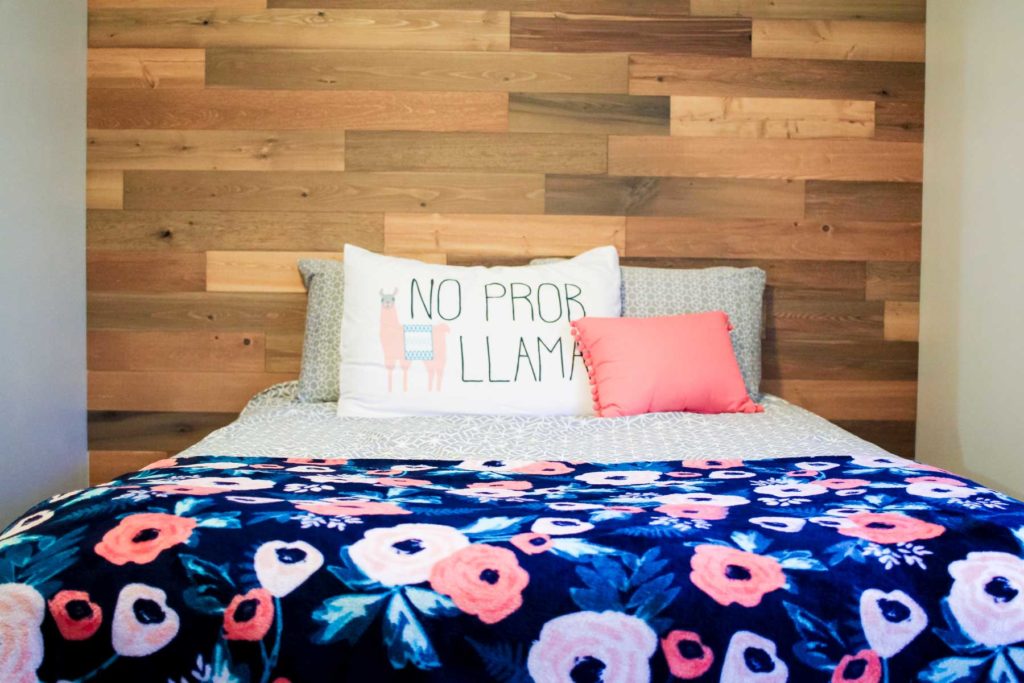

I love how this wall made a smaller room look and feel bigger! Who’s ready to come for a visit?
We even made a time lapse video of the installation to show you how the full installation process went!
Disclaimer: I received a product sample from timberchic to inspire my post. All thoughts and opinions are my own.
Video music provided royalty free by Hook Sounds.
It’s really a great and useful piece of info. I’m happy that you just shared this helpful info with us.
Please keep us informed like this. Thanks for sharing.
Hi there mates, pleasant article and nice arguments commented here,
I am genuinely enjoying by these.
It’s an awesome paragraph in favor of all the online users; they will
get advantage from it I am sure.
Thankfulness to my father who shared with me
regarding this blog, this web site is in fact amazing.
Производство и поставка – производители шпильки производства Северсталь метиз ОСПАЗ со склада в г.Орел.
Продажа трос оптом и в розницу по низким ценам.
Полный каталог всей метизной продукции, описания, характеристики, ГОСТы и технические условия.
Офоррление заказа и доставка в сжатые сроки. Возможна отгрузка железнодорожным транспортом. Цены производителя.
Hi there! Do you use Twitter? I’d like to follow you if that would be ok.
I’m undoubtedly enjoying your blog and look forward to new updates.
I like looking through a post that will make people think.
Also, thanks for allowing me to comment!
Компания предлагает полный спектр услуг по производство павильонов
[b]Перейти[/b] – https://t-dizain.ru/news/proizvodstvo-pavilonov/
Предлагаем услуги по производство павильонов
[b]Узнать подробнее[/b] – https://grand33.ru/blog/proizvodstvo-pavilonov/
Do you have a spam issue on this site; I also am a blogger, and I was wondering your situation; many of us have created some nice methods and we are looking to
exchange strategies with other folks, please shoot me an e-mail if interested.
Предлагаем услуги по монтаж каминов
[b]Перейти[/b] – https://hockeyskates.ru/blog/nashi-partnery/montazh-kaminov/
Greetings from Florida! I’m bored to tears at work so I decided to check out your blog on my iphone
during lunch break. I love the info you provide here and can’t wait
to take a look when I get home. I’m surprised at how fast your blog loaded on my
cell phone .. I’m not even using WIFI, just 3G ..
Anyways, very good blog!
Hi everyone, it’s my first pay a visit at this web site,
and paragraph is in fact fruitful in support of me, keep up posting these posts.
I was curious if you ever considered changing the page layout of your website?
Its very well written; I love what youve got to say. But maybe you could a
little more in the way of content so people could connect with it better.
Youve got an awful lot of text for only having 1 or
2 images. Maybe you could space it out better?
Investigate a superb of non-stop enjoyment with [url=https://www.moviesjoy.cc/]MoviesJoy[/url], your go-to terminus in search streaming TV series online.
Jump into a dissimilar collection of sought-after and trending shows in tall worth, all available at your fingertips[url=https://www.moviesjoy.cc/tvshows/].[/url]
Производство и поставка – сетка тканая фильтровая производства Северсталь метиз ОСПАЗ со склада в г.Орел.
Продажа тканая сетка магазин оптом и в розницу по низким ценам.
Полный каталог всей метизной продукции, описания, характеристики, ГОСТы и технические условия.
Офоррление заказа и доставка в сжатые сроки. Возможна отгрузка железнодорожным транспортом. Цены производителя.
I like the helpful info you provide in your articles. I will bookmark your blog and check again here frequently.
I am quite certain I will learn plenty of new stuff right here!
Best of luck for the next!
What’s up to every one, the contents present at this website are genuinely amazing
for people knowledge, well, keep up the good
work fellows.
Have you ever considered about including a little bit
more than just your articles? I mean, what
you say is important and all. However think of if you added some great images or videos
to give your posts more, “pop”! Your content is excellent but with images
and clips, this website could definitely be one of
the most beneficial in its niche. Very good blog!
levitra generic buy [url=https://levinevino.com]levitra online ireland[/url] vardenafil 20mg uk
vardenafil tab 20mg levitra cost levitra online india
If some one wishes expert view on the topic of blogging afterward i advise him/her
to go to see this blog, Keep up the nice job.
I have been surfing online more than three hours lately,
yet I never discovered any attention-grabbing article like yours.
It is beautiful price enough for me. In my opinion, if all website owners and bloggers made good content material
as you probably did, the web shall be much more useful than ever before.
[b][url=https://momspace.ru/articles/vtyagivayetsya-zhivot-pri-beremennosti-stoit-li-perezhivat-i-kogda-nuzhno-k-vrachu/]втянутый беременный живот[/url][/b]
Может быть полезным: https://momspace.ru/11-nedel-beremennosti/ или [url=https://momspace.ru/articles/kogda-mekoniy-prosto-norma-a-kogda-vazhniy-signal-dlya-vracha/]что значит меконий[/url]
[b][url=https://momspace.ru/psikhologiya/]психология женщины[/url][/b]
La experiencia es totalmente segura, gracias a tecnologias de cifrado de datos de
ultima generacion. Ademas, puedes hacer tus cargas y retiros de forma rapida con metodos populares como tarjetas locales,
transferencias o billeteras electronicas peruanas.
I love watching the latest movies and TV shows online on MoviesJoy – it’s fast, unsolicited, and easy to use.
Whenever I fancy to moderate, I go to MoviesJoy to freshet my favorite series and films without any hassle.
[url=https://moviesjoy-to.online/]MoviesJoy[/url] is my go-to website towards watching top-rated movies and binge-worthy shows anytime, anywhere.
[url=https://to.moviesjoy.cc/tvshows/].[/url]
I proclivity watching the latest movies and TV shows online on MoviesJoy – it’s tied, unsolicited, and easy to use.
Whenever I want to slacken up on, I go to MoviesJoy to deluge my favorite series and films without any hassle.
[url=https://moviesjoy-to.online/]MoviesJoy[/url] is my go-to website in place of watching top-rated movies and binge-worthy shows anytime, anywhere.
[url=https://to.moviesjoy.cc/tvshows/].[/url]
I proclivity watching the latest movies and TV shows online on MoviesJoy – it’s attached, bountiful, and easy to use.
Whenever I fancy to slacken up on, I go off to MoviesJoy to deluge my favorite series and films without any hassle.
[url=https://moviesjoy-to.online/]MoviesJoy[/url] is my go-to website towards watching top-rated movies and binge-worthy shows anytime, anywhere.
[url=https://to.moviesjoy.cc/tvshows/].[/url]
Когда лечение зубов проходит на высоком уровне, люди рекомендуют врачей друзьям и приходят снова. [url=https://moscow-stomatolog.ru/]стоматология поликлиника перово[/url]– это место, где ценят каждого пациента и обеспечивают долгосрочный результат .
[url=http://www.chery-russia.ru/]http://www.chery-russia.ru/[/url] можно с выгодой до 15% – спешите, количество автомобилей по специальным ценам ограничено! Мы предлагаем лучшие условия на рынке.
Производство и поставка – сетка для кладки производства Северсталь метиз ОСПАЗ со склада в г.Орел.
Продажа сетка транспортерная оптом и в розницу по низким ценам.
Полный каталог всей метизной продукции, описания, характеристики, ГОСТы и технические условия.
Офоррление заказа и доставка в сжатые сроки. Возможна отгрузка железнодорожным транспортом. Цены производителя.
Good article. I will be dealing with many of
these issues as well..
pmkmebel.ru Прокат классической мебели для стильных праздников. Березовые стулья в аренду.
аренда мебели выставочная Экспозиционное оборудование в аренду. Модульные системы для успешной презентации.
аренда мебели на выставку цены Текущие тарифы на прокат оснащения для выставок. Честная калькуляция и точный расчет.
http://www.pmkmebel.ru Прокат трансформируемой мебели для изменяемых пространств. Модули из мебели.
https://www.pmkmebel.ru Уличная мебель зимой для холодного времени. Инфракрасные приборы организуем.
аренда мебели и оборудования Комплексное оснащение в временное использование. Комплексный подход для вашего мероприятия.
аренда мебели под мероприятие Комплектация оснащения под ваше мероприятие. Учет всех пожеланий и профессиональная консультация.
http://www.pmkmebel.ru Прокат баннерных конструкций для фотозон. Баннерные конструкции напрокат.
аренда мебели московская область Аренда мебели в пригородах Москвы. Быстрая доставка по всей области.
аренда мебели посуточно Посуточная аренда мебели по выгодным условиям. Гибкий период аренды.
мебель в аренду для мероприятий Надежное оборудование в временное пользование для мероприятий. Полный пакет от опытной команды.
аренда мебели для дня рождения Стильный декор для юбилея. Дизайн интерьера с учетом тематики.
аренда мебели для праздников Праздничное оформление с красивыми элементами. Оформим пространство вашей мечты.
pmkmebel.ru Мебель для салона и торговых площадок. Стеллажи напрокат.
http://www.pmkmebel.ru Прокат подвесных диванов для дачных мероприятий. Подвесные диваны в аренду.
https://www.pmkmebel.ru Столы квадратной формы для кафе. Размеры 70х70 см в ассортименте.
https://www.pmkmebel.ru Контрастная мебель для стильных мероприятий. Темный декор напрокат.
аренда мебели для форума Профессиональное оснащение для деловых встреч. Комфортные решения и оперативный монтаж.
аренда мебели москва Временное снабжение в городе для мероприятий. Широкий выбор и лояльные тарифы.
pmkmebel.ru Аренда мебели для семинара и тренингов. Флипчарты в аренду.
аренда мебели цены Демократичные тарифы на весь ассортимент. Гибкая ценовая политика для крупных заказов.
http://www.pmkmebel.ru Аренда табуретов для кухонных зон. Пластиковые стулья в ассортименте.
мебель в аренду для выставки Мебель для выставки в временное использование. Универсальные конструкции для вашей презентации.
аренда мебели форум Конференц-мебель для конференций. Удобные модели и быстрая установка.
аренда мебели для мероприятий москва с доставкой Комплексная услуга для мероприятий с подачей по Москве. Бережная перевозка и качественный монтаж.
mebeltrading.ru Аренда трибун для презентаций. Деревянные трибуны по запросу.
mebeltrading.ru Аренда арок для входных групп. Живые конструкции с декором.
аренда мебели для мероприятий москва недорого Экономичные условия мебели для событий в Москве. Высокое качество по демократичной стоимости.
https://mebeltrading.ru Аренда оттоманок для дополнительного хранения. Оттоманки с крышкой напрокат.
https://mebeltrading.ru Аренда гардероба для раздевалок. Напольные вешалки с подачей.
аренда мебели для выставки москва Стенды и витрины для презентаций в Москве. Трансформируемые конструкции с оперативной установкой.
аренда мебели на прокат Прокат интерьера для дома. Персональный подход и широкий выбор.
https://mebeltrading.ru Прокат мебели для ярмарки на маркетах. Устойчивые конструкции в аренду.
https://mebeltrading.ru Аренда тумб для гостиничных номеров. ТВ-тумбы в аренду.
https://mebeltrading.ru Аренда банкетной мебели по низким тарифам. Пакетные предложения для мероприятий.
аренда мебели для конференции москва Конференц-мебель для форумов в Москве. Комфортные решения и профессиональная сборка.
Wow, this article is fastidious, my younger sister is analyzing these kinds of things, therefore I am going to inform her.
Забронируйте комфортное жильё уже сегодня и наслаждайтесь комфортным отдыхом.
какие писатели жили в санкт петербурге
@airbn@b77 https://sutochny.ru/bilety-oteli/
Hello there, just became alert to your blog through Google, and found that it’s
really informative. I’m gonna watch out for brussels.
I will appreciate if you continue this in future.
Many people will be benefited from your writing.
Cheers!
hi!,I love your writing so a lot! share we keep up a correspondence extra approximately your
post on AOL? I require an expert in this house to resolve my problem.
May be that is you! Taking a look forward to look you.
It’s great that you are getting ideas from this post as well as from our dialogue made at this place.
Hello, I enjoy reading through your article post. I wanted to write a little comment to support you.
Glad I’m on the resortslot community.
Playing for hours – best decision ever.
Just resortslot!
I do agree with all the concepts you’ve introduced on your post.
They’re really convincing and will certainly work.
Nonetheless, the posts are very short for novices.
May you please extend them a bit from subsequent time?
Thank you for the post.
Производство и поставка – купить гайки производства Северсталь метиз, Мечел, ММК Метиз, Силур со склада в г.Орел.
Продажа крепежные гайки оптом и в розницу по низким ценам.
Полный каталог всей метизной продукции, описания, характеристики, ГОСТы и технические условия.
Оформление заказа и доставка в сжатые сроки. Возможна отгрузка транспортной компанией.
Цены производителя.
Наша компания предлагает сетка тканая н/у ГОСТ производства Северсталь метиз ОСПАЗ со склада
г.Орел. В наличии огромный ассортиментсетка тканая н/у ГОСТ 3826.
Вы можете купить сетка тканая ГОСТ 3187-76 светлую и оцинкованную.
У нас всегда в наличии огромный выбор сетка тканая ГОСТ 6613-76, цены от производителя.
Продажа сетка металлическая тканая оптом и в розницу со склада г.Орел.
I do believe all the ideas you’ve introduced to your post.
They are really convincing and can certainly
work. Nonetheless, the posts are very short for novices.
May just you please prolong them a bit from next time?
Thanks for the post.
Very good write-up. I certainly love this website. Thanks!
Does your website have a contact page? I’m having a tough time locating
it but, I’d like to shoot you an e-mail. I’ve got some suggestions for your blog you might
be interested in hearing. Either way, great website and I look forward to seeing it grow over time.
If you desire to improve your know-how just
keep visiting this web page and be updated
with the most up-to-date information posted here.
Производство и поставка – сила затяжки болтов производства Северсталь метиз, Мечел, ММК Метиз, Силур со склада в г.Орел.
Продажа деревянный болт оптом и в розницу по низким ценам.
Полный каталог всей метизной продукции, описания, характеристики, ГОСТы и технические условия.
Оформление заказа и доставка в сжатые сроки. Возможна отгрузка транспортной компанией.
Цены производителя.
linitoto
always i used to read smaller articles that as well clear their motive, and that is also
happening with this paragraph which I am reading at this
time.
Hmm is anyone else encountering problems with the images on this blog
loading? I’m trying to figure out if its a problem on my end or if it’s the blog.
Any suggestions would be greatly appreciated.
Helpful info. Similar to my post: Lemoncasino-pl.top.
My spouse and I absolutely love your blog and find nearly all of your post’s to be just
what I’m looking for. Do you offer guest writers to write content to suit your
needs? I wouldn’t mind publishing a post or elaborating
on a lot of the subjects you write regarding here.
Again, awesome web site!
Every weekend i used to go to see this web site, for the reason that i wish for enjoyment,
for the reason that this this site conations truly fastidious
funny stuff too.
Casino Rating 2026 with free spins https://digi-mktg.com/
bokep
Howdy! I know this is somewhat off topic but I was
wondering which blog platform are you using for
this site? I’m getting fed up of WordPress because I’ve had problems with hackers
and I’m looking at options for another platform.
I would be fantastic if you could point me in the direction of a good platform.
My partner and I stumbled over here coming from a different web page and thought I might check things out.
I like what I see so now i am following you.
Look forward to looking into your web page for a second time.
cibai
Appreciating the dedication you put into your blog and detailed information you offer.
It’s awesome to come across a blog every once in a while that isn’t the same
old rehashed material. Excellent read! I’ve bookmarked
your site and I’m adding your RSS feeds to my Google account.
memek
My family every time say that I am wasting my time here at net, however I know I am getting
familiarity all the time by reading such pleasant articles.
memek
Hey There. I found your weblog the usage of msn. This is a really well written article.
I will make sure to bookmark it and return to read extra
of your helpful information. Thanks for the post. I’ll certainly comeback.
anjing
My relatives always say that I am killing my time here at net, however I know
I am getting knowledge all the time by reading
such nice content.
xnxx
You are so cool! I do not think I’ve read through anything like that before.
So wonderful to discover someone with original
thoughts on this subject. Really.. thanks for starting this up.
This site is one thing that is needed on the internet, someone with a little originality!
memek
I get pleasure from, cause I discovered exactly what I used to
be taking a look for. You have ended my 4 day lengthy
hunt! God Bless you man. Have a nice day. Bye
xnxx
I’m not sure exactly why but this website is loading incredibly slow for
me. Is anyone else having this issue or is it a
issue on my end? I’ll check back later on and see if the problem
still exists.
I’d like to thank you for the efforts you have put in penning this blog. I really hope to see the same high-grade content by you in the future as well. In fact, your creative writing abilities has motivated me to get my own site now 😉
I’m truly enjoying the design and layout of your site. It’s a very easy on the eyes which makes it much more enjoyable for me to come here and visit more often. Did you hire out a developer to create your theme? Outstanding work!
Simply desire to say your article is as
amazing. The clarity in your post is just excellent and i
can assume you’re an expert on this subject. Well with your permission let
me to grab your feed to keep updated with forthcoming
post. Thanks a million and please carry on the enjoyable work.
In fact no matter if someone doesn’t be aware of
then its up to other people that they will help, so here it happens.
Cryptify Hub 是领先的加密教育平台,专注为香港及亚洲用户提供免费的区块链入门课程、比特币原理、DeFi 安全指南及投资实战策略。我们相信,知识是抵御市场风险的最佳资产。
It’s fantastic that you are getting ideas from this article as well as from our dialogue made at this time.
Simply wish to say your article is as astonishing. The clarity
for your publish is just excellent and that i could
assume you’re knowledgeable in this subject. Well with your permission let me to
grasp your RSS feed to stay updated with drawing close post.
Thanks a million and please continue the gratifying work.
Persönlich konnte in den letzten Wochen viele
neue Einblicke erhalten, als man mich intensiver betreffend diesem Marktteilnehmer befasst bin. Vorab fiel mir auf, dass besagte Bandbreite bezüglich Casino-Spielen erstaunlich groß
wirkt, vornehmlich obwohl der User häufig moderne Games spielt.
Ein neuer Aspekt ist bestimmt besagte Live-Angebot, weil
während beim spinko live casino stößt der Spieler
wirklich eine gelungene Kulisse, welche man sonst selten in physischen Spielhallen findet.
Jedoch darf man stets hinsichtlich ein gutes Budget achten, denn jene Gefahren trotz aller Freizeit
selbstverständlich existieren. Habt ihr euch
schon irgendwann genauer bezüglich den Auszahlungsmodalitäten befasst?
Wie bewertet ihr eigentlich diese Regelungen eigentlich?
Meinerseits bin echt gespannt hinsichtlich
eure eigene Eindrücke.
Any occasion a person checks the gambling site, one finds persistently
an idea new to master on that sector. This remains evolving quite rapidly,
mostly with new loyalty schemes one that honestly aid all active
users. I noticed some extremely good info about spinogambino bet when scanning after stable and quick brands.
My main point concerns game diversity serves as crucial nowadays;
if any platform does not update the collection regularly, I will tend to feel disinterested quite quickly.
Moreover, do some of the players sampled employing specific advanced secure deposit options?
Such tools seem to stay much increasingly reliable against the
classic wire transfers. Which acts as the favorite strategy when you starts exploring a fresh digital environment?
I would want to see how others reckon over today’s state within our leisure sphere!
Abych byl upřímný, že jsem si nedávno docela dost zaujalo, jak se celkově změnila kvalita mobilních aplikací pro svět virtuálního casina.
Dříve jsem měl pocit, že hraní na mobilu jsou jen takovým doplňkem, ale dnes už je
to úplně o něčem jiném. Člověk si všimne, jak je ovládání intuitivní,
dokonce i v případě, že máte trochu slabší připojení.
Pokud někdo hledá místo, kde najít recenze, tak doporučuji
roll dorado mobile app protože mi
tam pomohli, jasné přehledy, které byly hodně
užitečné. Co vy na to, hrajete spíše na telefonu?
Taky se vám stává, že skrze aplikaci se vám daří více?
Budu rád, když se podělíte o zkušenosti, jelikož sdílení tipů a postřehů nám všem může
hodně napovědět.
Have you ever thought about publishing an e-book or
guest authoring on other sites? I have a blog based on the same information you discuss and would really like to have you share some
stories/information. I know my visitors would value your work.
If you are even remotely interested, feel free to
send me an e-mail.
Fastidious answer back in return of this query with solid arguments
and telling the whole thing regarding that.
I’ve seen that really that vibe inside modern internet platforms is totally
transformed towards more advanced features. It is strange the way we used to love simple slots, but now everybody seems to look for
specific huge payouts like the Fishing Frenzy that might actually deliver a few insane runs.
One detail I saw remains how being patient is important way higher than total luck while
a player decide to Fishing Frenzy slots so as to maximize the final
budget. Tell me, do you feel if the volatility models get becoming rather wild among
regular users? I still think that using a firm budget
stays that only way to keep the whole hobby pleasant.
What would be everyone’s personal approach when the game’s symbols simply aren’t hitting
the large wins during a wide session?
I’m truly enjoying the design and layout of your website.
It’s a very easy on the eyes which makes it much more enjoyable for me to come here and visit more often. Did you hire out a
designer to create your theme? Exceptional work!
Howdy are using WordPress for your blog platform?
I’m new to the blog world but I’m trying to get started and create my
own. Do you need any html coding expertise to make your own blog?
Any help would be really appreciated!
Hmm it appears like your site ate my first comment (it was
super long) so I guess I’ll just sum it up what I
submitted and say, I’m thoroughly enjoying your blog.
I too am an aspiring blog blogger but I’m still new to everything.
Do you have any helpful hints for rookie blog writers?
I’d definitely appreciate it.
You made some decent points there. I looked on the internet for additional information about the issue
and found most individuals will go along with your views on this web site.
Greetings from Los angeles! I’m bored to tears at work
so I decided to check out your blog on my iphone during lunch break.
I really like the knowledge you present here and can’t wait to take
a look when I get home. I’m amazed at how fast your blog loaded on my cell phone ..
I’m not even using WIFI, just 3G .. Anyhow, superb site!
I’m not sure exactly why but this website is loading very slow for me.
Is anyone else having this problem or is it a problem on my end?
I’ll check back later and see if the problem still exists.
I think the admin of this website is in fact working hard in favor of his site, as
here every material is quality based information.
You can definitely see your expertise in the work you write.
The arena hopes for more passionate writers like you who are not afraid to mention how
they believe. At all times follow your heart.
To be fair, I’ve spent quite countless hours trying out many
casino sites this year, and it is plain to see that the landscape really has altered a
lot. First off, I’ve spotted that locating a decent
operator feels half the battle if you want to staying power in this game.
Additionally, some punters fail simply since they follow fast profits
instead of holding onto a strict management approach.
Reading about chicken road 2 app really give anyone
sharpen the vital habits, particularly if you happen to be
just getting started. Ultimately, do not you feel
that impulsive decision-making is the number one enemy when it comes
to consistent gains? Which specific tactics
do you observed work consistently in your experience?
Great post.
Pretty nice post. I just stumbled upon your weblog and wanted to say that I’ve truly
enjoyed surfing around your blog posts. In any case I’ll be subscribing to your rss
feed and I hope you write again soon!
Hmm is anyone else experiencing problems with the pictures on this blog loading?
I’m trying to determine if its a problem on my end or if it’s the blog.
Any feed-back would be greatly appreciated.
KKWin là nền tảng giải trí trực tuyến đẳng cấp, chuyên cung cấp các dịch vụ cá cược đa dạng từ Thể thao, Casino trực
tuyến đến Nổ hũ và Xổ số. Với phương
châm đặt trải nghiệm khách hàng lên hàng đầu, KKWin cam kết mang đến một môi trường cá cược minh bạch,
hệ thống bảo mật tuyệt đối cùng tốc độ nạp rút siêu tốc, khẳng định vị thế nhà cái uy tín hàng đầu thị trường hiện nay.
Write more, thats all I have to say. Literally, it seems as though you
relied on the video to make your point. You definitely know what youre talking
about, why waste your intelligence on just
posting videos to your blog when you could be giving us something enlightening to read?
Hello there! This blog post couldn’t be written any better!
Reading through this article reminds me of my previous roommate!
He always kept talking about this. I’ll forward this post to him.
Pretty sure he will have a good read. Many thanks for sharing!
Heya i am for the first time here. I found this board and I
find It truly useful & it helped me out much.
I hope to give something back and help others like you helped me.
Thanks to my father who shared with me regarding
this weblog, this blog is genuinely awesome.
hello there and thank you for your information – I have definitely picked up anything new from right here.
I did however expertise some technical points using this site, as I experienced
to reload the web site a lot of times previous to I could get it to load properly.
I had been wondering if your web hosting is OK?
Not that I’m complaining, but slow loading instances times
will very frequently affect your placement in google and could damage your quality score
if advertising and marketing with Adwords. Anyway I’m adding this
RSS to my email and could look out for a lot more
of your respective intriguing content. Make sure you update this again very soon.
I’m not sure why but this website is loading very slow for
me. Is anyone else having this issue or is it a issue on my end?
I’ll check back later on and see if the problem still exists.
Hi my friend! I wish to say that this post is amazing, great written and come with
approximately all significant infos. I’d like to peer more posts like this .
It’s nearly impossible to find experienced people for this topic,
but you sound like you know what you’re talking about!
Thanks
I am not certain the place you are getting your info, but great topic.
I needs to spend a while studying more or figuring out
more. Thank you for wonderful info I was searching for this information for my
mission.
Just desire to say your article is as astounding. The clarity
for your post is just cool and i could think you are an expert on this subject.
Well together with your permission let me to take
hold of your RSS feed to stay up to date with coming near near post.
Thanks a million and please keep up the rewarding work.
I enjoy what you guys are up too. This sort
of clever work and exposure! Keep up the wonderful works
guys I’ve incorporated you guys to my personal blogroll.
Solid write-up. Came across the same issue lately and this cleared thins upp nicely.
What I liked most was the honest tone. Saving
this for sure — realpy appreciate thee effort.
If some one desires expert view regarding blogging after that i propose him/her to visit this web site, Keep up the nice work.
If some one needs to be updated with most up-to-date technologies
afterward he must be go to see this website and be up
to date daily.
Incredible points. Sound arguments. Keep up the great
spirit.
Howdy! This is kind of off topic but I need some advice from an established blog.
Is it very hard to set up your own blog? I’m not very
techincal but I can figure things out pretty quick. I’m thinking about creating my
own but I’m not sure where to start. Do you have any points or suggestions?
Cheers
Excellent blog here! Also your website loads up very fast!
What web host are you using? Can I get your affiliate link to your
host? I wish my web site loaded up as fast as yours lol
Very descriptive blog, I enjoyed that bit. Will there be a part 2?
bookmarked!!, I like your blog!
Very rapidly this web page will be famous among all blogging and site-building viewers, due to it’s good posts
Do you have a spam issue on this blog; I also am a blogger, and I was wanting to know
your situation; we have developed some nice practices and we are looking to exchange methods with other folks,
please shoot me an e-mail if interested.
Postingan yang bagus! Ulasan ini sangat relevan bagi saya
yang suka mencari situs dengan modal kecil namun terpercaya.
Saya sangat puas bermain di **1131GG** karena mereka adalah **Bandar Slot Dana
5 Ribu** yang benar-benar memberikan **Layanan Cepat**.
Kelebihan lainnya adalah **Deposit Tanpa Biaya Tambahan**, jadi saldo kita tetap utuh.
Terima kasih sudah berbagi! Kunjungi 1131GG Sekarang
Touche. Solid arguments. Keep up the good work.
Hey! Quick question that’s completely off topic. Do you know
how to make your site mobile friendly? My website looks weird when viewing from my iphone.
I’m trying to find a theme or plugin that might be able
to correct this problem. If you have any suggestions, please share.
Many thanks!
Hello there! Do you know if they make any plugins to safeguard against hackers?
I’m kinda paranoid about losing everything I’ve worked hard on. Any suggestions?
What’s up to all, the contents present at this web page are really remarkable
for people knowledge, well, keep up the good work fellows.
I have been surfing online more than 3 hours today, yet I never found any interesting article like
yours. It is pretty worth enough for me. Personally, if all site owners and bloggers made good content as
you did, the net will be a lot more useful than ever before.
Wow that was strange. I just wrote an really long comment but after I clicked submit my comment didn’t appear.
Grrrr… well I’m not writing all that over again. Anyways, just wanted to say wonderful blog!
This paragraph is truly a good one it assists new the web users, who are
wishing for blogging.
This page certainly has all of the information and
facts I wanted about this subject and didn’t know who
to ask.
Hi all, here every one is sharing such knowledge,
so it’s nice to read this website, and I used to go to see
this weblog daily.
What i don’t understood is in truth how you’re now not actually much more neatly-appreciated than you may be now.
You are very intelligent. You know thus considerably on the subject of this subject, produced me in my opinion imagine it from a lot of varied angles.
Its like men and women aren’t fascinated except it is
something to do with Woman gaga! Your personal stuffs nice.
At all times care for it up!
Terrific article! That is the kind of info that
should be shared across the net. Shame on Google for no
longer positioning this put up higher! Come on over and discuss with my site .
Thanks =)
I am not sure where you are getting your information, but
great topic. I needs to spend some time learning much more or understanding more.
Thanks for great information I was looking for this information for
my mission.
I like the helpful info you provide for your articles.
I’ll bookmark your weblog and take a look at again right here
frequently. I’m relatively sure I will learn many new stuff right
here! Best of luck for the following!
I blog frequently and I genuinely appreciate your information. This article has really peaked my interest.
I’m going to bookmark your blog and keep checking
for new details about once per week. I opted in for
your Feed as well.
Great article! That is the kind of info that should be shared across the net.
Disgrace on Google for now not positioning this publish higher!
Come on over and seek advice from my site . Thanks =)
Hey, I think your blog might be having browser compatibility issues.
When I look at your blog in Ie, it looks fine but
when opening in Internet Explorer, it has some overlapping.
I just wanted to give you a quick heads up!
Other then that, excellent blog!
Article writing is also a excitement, if you be familiar with then you
can write if not it is complex to write.
It is perfect time to make a few plans for the future and it’s
time to be happy. I have learn this submit and if I may just I desire to recommend you few fascinating
issues or advice. Maybe you could write subsequent articles referring to this article.
I want to read more issues approximately it!
What’s up mates, nice piece of writing and good arguments commented at this place,
I am truly enjoying by these.
Hi, i think that i saw you visited my weblog
thus i came to “return the favor”.I’m attempting to find things to improve my site!I suppose
its ok to use a few of your ideas!!
wonderful post, very informative. I wonder why the opposite experts of this sector do not notice this.
You should continue your writing. I am sure, you’ve a great readers’
base already!
I’d like to thank you for the efforts you’ve put in penning this blog.
I’m hoping to check out the same high-grade content by you
in the future as well. In fact, your creative
writing abilities has inspired me to get my own blog now 😉
Thank you, I have recently been looking for information approximately this topic for ages and yours is the
greatest I have found out so far. But, what about the conclusion? Are you sure about the supply?
This is my first time go to see at here and i am in fact impressed to read all at single place.
Way cool! Some very valid points! I appreciate you writing this article plus the rest of the website is also
really good.
These are truly impressive ideas in about blogging. You
have touched some pleasant things here. Any way keep up wrinting.
You actually make it seem so easy with your presentation but I find this topic to be actually something that I think I would never
understand. It seems too complicated and extremely
broad for me. I am looking forward for your next post, I’ll try to get the hang of it!
After looking into a number of the blog posts on your blog, I truly like your way of blogging.
I added it to my bookmark website list and will be checking back in the near future.
Take a look at my website too and tell me how you feel.
Hi there! Do you know if they make any plugins to help with SEO?
I’m trying to get my blog to rank for some targeted
keywords but I’m not seeing very good gains. If you know of any
please share. Many thanks!
This excellent website really has all of the information and
facts I wanted about this subject and didn’t know
who to ask.
Great blog right here! Additionally your website rather a lot up fast!
What host are you the use of? Can I get your affiliate link in your host?
I want my website loaded up as fast as yours lol
My brother suggested I might like this blog.
He was totally right. This post actually made my day.
You can not imagine just how much time I had spent for this info!
Thanks!
I love it whenever people come together and share opinions.
Great blog, stick with it!
Do you have any video of that? I’d love to find out some additional information.
I just like the valuable information you supply for your articles.
I will bookmark your weblog and test again right here frequently.
I am reasonably certain I will be informed a lot of new
stuff right right here! Best of luck for the following!
Хватит терпеть бесконечные глупую цензуру — без шуток появился инструмент !
Встречайте Xray VPN — по-настоящему не поделка на коленке, а уникальный комплекс обхода , разработанный в первую очередь для стран с DPI-фильтрацией .
В его основе лежит связка VLESS+XTLS , который дурачит любую систему глубокого анализа — и даже самые новые методы блокировки проходят мимо .
Что это даёт на практике?
✅ Игнорирование всех видов региональных запретов .
✅ Отключение скоростных рамок — играйте на полной скорости .
✅ Работа там, где разрешены только «одобренные» сайты — офисные сети открываются на раз-два.
✅ Доступ к любому контенту из любой точки — YouTube, Telegram, Netflix, Discord, Spotify — всё работает даже при замедлении от провайдера .
И что важно — провайдер видит только белый шум — полное шифрование .
Пинг — на высоте — прямым магистралям вы имеете стабильный канал даже в час пик .
Почему именно XrayNet, а не другие?
Потому что обычные VPN-сервисы давно заблокированы , а наша технология подгружает свежие конфиги в реальном времени — благодаря этому даже если один адрес попал под блокировку — мы зеркалимся за секунды .
Проверьте сами — переходите по одному из адресов :
➡️ https://zelenka.guru/threads/9808558/
Скачивайте без регистрации — и интернет станет безграничным .
Перешлите другу — пусть и они оценили .
РКН строит стены — мы их сносим .
Добро пожаловать в свободный интернет
We’re a group of volunteers and starting a new scheme
in our community. Your web site provided us with valuable info to
work on. You’ve done an impressive job and our entire community
will be grateful to you.
I am regular reader, how are you everybody? This article posted at this website
is in fact fastidious.
I am sure this article has touched all the internet users,
its really really pleasant article on building up new web site.
This paragraph will help the internet people for building
up new weblog or even a weblog from start to end.
Hello, I do believe your site could possibly be having web browser compatibility problems.
Whenever I look at your site in Safari, it looks fine but when opening in I.E., it’s got some overlapping issues.
I merely wanted to provide you with a quick heads up!
Besides that, great website!
To be fair, I’ve consistently felt the fact that choosing
the decent platform seems to be the crucial aspect
to securing positive. Of late, the author have
been testing out various styles seeing as some fluctuations has the potential to become rather intense.
While these grinds, I noted the truth is that tracking the capital proves as essential as selecting the perfect vegashero login slot itself.
It appears that so many people dive right into higher-stakes
stakes missing proper research. Also, can you tell me if anyone on this board
thinks like the reward schemes appear getting more complex for unlock?
I would love if you could see your thoughts
concerning this usual gambling experience.
When someone writes an piece of writing he/she maintains the idea of a user in his/her mind that how a user can understand it.
Therefore that’s why this post is outstdanding.
Thanks!
I was suggested this blog by way of my cousin. I’m not sure whether
this put up is written by means of him as no one else realize
such specified approximately my problem. You’re incredible!
Thanks!
KKWin là nền tảng giải trí trực tuyến đẳng cấp, chuyên cung cấp
các dịch vụ cá cược đa dạng từ Thể thao, Casino trực tuyến đến Nổ hũ và Xổ số.
Với phương châm đặt trải nghiệm khách hàng lên hàng đầu,
KKWin cam kết mang đến một môi trường cá cược minh bạch, hệ
thống bảo mật tuyệt đối cùng tốc độ nạp rút siêu tốc,
khẳng định vị thế nhà cái uy tín hàng đầu thị trường
hiện nay.
I love what you guys tend to be up too. This
kind of clever work and reporting! Keep up the excellent works guys
I’ve added you guys to blogroll.
Vodka Casino — официальный сайт https://www.trustpilot.com/review/vodkazerkalo.pages.dev
Hurrah, that’s what I was looking for, what a information! present here at this
blog, thanks admin of this web site.
I’ve learn several excellent stuff here. Definitely value bookmarking for revisiting.
I wonder how much effort you set to make this type of great
informative website.
Hello, i read your blog occasionally and i own a similar one and i was just curious if you get a lot of
spam responses? If so how do you stop it, any plugin or
anything you can recommend? I get so much lately it’s
driving me mad so any support is very much appreciated.
You can certainly see your expertise within the work you write.
The arena hopes for more passionate writers like you who
are not afraid to mention how they believe. At all times go after
your heart.
Everyone loves what you guys are usually up too.
This sort of clever work and coverage! Keep up the excellent works guys I’ve included you guys to my own blogroll.
Yes! Finally something about .
Heya just wanted to give you a quick heads up and let you know a few
of the pictures aren’t loading correctly. I’m not sure
why but I think its a linking issue. I’ve
tried it in two different web browsers and both show the same outcome.
Hi colleagues, fastidious piece of writing and fastidious arguments commented here, I am in fact enjoying by these.
Wow that was odd. I just wrote an incredibly long comment but after I clicked submit my comment didn’t show
up. Grrrr… well I’m not writing all that over
again. Anyway, just wanted to say wonderful blog!
Hello there! I could have sworn I’ve visited your blog before but
after going through some of the articles I realized it’s new to me.
Nonetheless, I’m definitely pleased I discovered it and I’ll be bookmarking it and checking back often!
Link exchange is nothing else but it is just placing the other person’s webpage link on your page at suitable place and other person will
also do similar in favor of you.
After checking out a few of the blog posts on your blog, I seriously appreciate your technique of blogging.
I saved as a favorite it to my bookmark site list and will be checking back in the near future.
Take a look at my website as well and tell me how you feel.
Wonderful goods from you, man. I’ve understand your stuff previous to and you are
just extremely fantastic. I actually like what you have acquired here, really like what you are saying and the
way in which you say it. You make it enjoyable and you still take care of to keep
it sensible. I can not wait to read far more from you.
This is actually a wonderful website.
Awesome website you have here but I was curious about
if you knew of any community forums that cover the same topics
talked about here? I’d really like to be a part
of community where I can get feed-back from other knowledgeable
people that share the same interest. If you have any recommendations,
please let me know. Many thanks!
I used to be able to find good advice from your blog posts.
Wonderful site you have here but I was wondering if
you knew of any discussion boards that cover the same topics talked about in this article?
I’d really like to be a part of community where I can get feed-back
from other experienced individuals that share the same interest.
If you have any recommendations, please let me know.
Kudos!
You need to be a part of a contest for one group of medicinal products the best blogs on the internet.
I am going to recommend this site!
I’m no longer sure the place you’re getting your info,
however great topic. I needs to spend a while studying more or figuring out more.
Thank you for wonderful info I was on the lookout for
this information for my mission.
Hi there to every one, the contents existing at this site are actually remarkable for people experience, well,
keep up the nice work fellows.
For most recent news you have to go to see internet and on the web I found this web page as a best web site for most recent updates.
Hi there, everything is going nicely here and ofcourse every
one is sharing information, that’s in fact excellent, keep up writing.
my web-site :: medicinal product for medical use
I savor, cause I discovered just what I was looking for. You have
ended my 4 day lengthy hunt! God Bless you man. Have a great day.
Bye
Saved as a favorite, I love your blog!
Right now it looks like WordPress is the top blogging platform out
there right now. (from what I’ve read) Is that what you’re using
on your blog?
We are a group of volunteers and starting a new scheme in our community.
Your web site offered us with valuable information to work on. You
have done an impressive job and our entire community will be grateful to you.
This web site truly has all of the information and facts
I wanted about this subject and didn’t know who
to ask.
hi!,I love your writing so a lot! share we keep up
a correspondence extra about your post on AOL?
I need a specialist on this house to resolve my problem.
Maybe that is you! Looking ahead to see you.
Heya i am for the first time here. I came across this board and I find It
truly useful & it helped me out much. I hope to give
something back and aid others like you helped me.
I really like your blog.. very nice colors & theme.
Did you make this website yourself or did you hire someone to do
it for you? Plz reply as I’m looking to construct my own blog and
would like to find out where u got this from. thanks a lot
This post provides clear idea in favor of the new visitors of blogging, that genuinely how
to do running a blog.
For the reason that the admin of this web site is working, no doubt very quickly it will
be renowned, due to its feature contents.
This is a very informative post about online casinos and betting platforms.
I especially liked how it explains the importance of choosing a licensed site before signing up.
Many players often ask where they can find reliable gaming
platforms with fair odds and smooth payouts.
From what I’ve seen, checking platforms
like vn22vip helps users compare features, bonuses, and overall experience.
Thanks for sharing these insights — they’re
helpful for both beginners and experienced bettors.
Undeniably consider that that you stated. Your favourite reason appeared
to be on the web the simplest thing to keep in mind composition of medical products.
I say to you, I certainly get annoyed whilst people consider issues
that they just do not know about. You controlled
to hit the nail upon the highest and outlined out the whole thing with no need side-effects , folks could take
a signal. Will likely be again to get more.
Thank you
Hi there, yup this paragraph is genuinely good and I
have learned lot of things from it concerning blogging.
thanks.
Unquestionably consider that that you said. Your favorite justification appeared to
be at the net the easiest thing to take into account of. I say to you, I definitely get irked whilst other folks think about concerns that they
just don’t recognize about. You controlled to hit
the nail upon the top as neatly as outlined out the whole thing with no need side effect , other folks can take a
signal. Will likely be again to get more. Thank you
I wanted to thank you for this excellent read!! I definitely enjoyed
every bit of it. I’ve got you book-marked to check out new things
you post…
Great site you have here but I was curious if you knew of any community forums that cover the same topics discussed in this article?
I’d really like to be a part of group where I can get
comments from other experienced people that share the same interest.
If you have any recommendations, please let me know. Kudos!
This is a very informative post about online casinos and betting platforms.
I especially liked how it explains the importance of choosing a trusted site before signing up.
Many players often ask where they can find reliable gaming platforms with fair
odds and smooth payouts. From what I’ve seen, checking
platforms like vn22vip helps users compare features, bonuses, and
overall experience.
Thanks for sharing these insights — they’re helpful for both beginners and experienced bettors.
This is a very informative post about online casinos and betting platforms.
I especially liked how it explains the importance of choosing a
secure site before signing up.
Many players often ask where they can find reliable gaming platforms with
fair odds and smooth payouts. From what I’ve seen, checking
platforms like vn22vip helps users compare features,
bonuses, and overall experience.
Thanks for sharing these insights — they’re helpful for both beginners and
experienced bettors.
It is appropriate time to make some plans for the future and it is time to be happy.
I’ve read this post and if I could I wish to suggest you some interesting
things or suggestions. Maybe you can write next articles referring to this article.
I wish to read more things about it!
ГдеБЕНЗ скачать приложение https://t.me/GDEBENZ_RU
Hi, I do believe this is an excellent web site.
I stumbledupon it 😉 I may come back yet again since i have book marked it.
Money and freedom is the greatest way to change, may you
be rich and continue to help others.
Hi just wanted to give you a quick heads up and let you know a few of the pictures aren’t
loading correctly. I’m not sure why but I think its a linking issue.
I’ve tried it in two different browsers and both show the same
outcome.
I have to say, the author has been fairly impressed
after how fun this the game actually has turned out these
days. To start with, I believed this title seemed only
one more instant game, yet a simple structure actually
draws us right back. A key point is whereby the tension as seeing this chicken run feels unparalleled.
Many players sometimes spotted which attempting this Chicken Road gameplay guide aids really as gamers want one better approach.
It looks like if a multiplier logic is fair next regarding many games.
Do you think that this variability really rather serious
regarding one simple round? Might any precise tricks folks
use for remain within this green track? Personally, I surely
love for learn the take via a game.
This is a very informative post about online casinos and betting platforms.
I especially liked how it explains the importance of choosing
a licensed site before signing up.
Many players often ask where they can find reliable gaming
platforms with fair odds and smooth payouts. From
what I’ve seen, checking platforms like vn22vip helps users compare features, bonuses, and
overall experience.
Thanks for sharing these insights — they’re helpful for both beginners and experienced bettors.
It’s a shame you don’t have a donate button! I’d most certainly
donate to this brilliant blog! I guess for now i’ll settle for book-marking and adding your RSS feed to my Google account.
I look forward to fresh updates and will share this site with my Facebook group.
Chat soon!
What’s up it’s me, I am also visiting this site
regularly, this website is really fastidious and the viewers are truly sharing fastidious thoughts.
This is a very informative post about online
casinos and betting platforms. I especially liked how
it explains the importance of choosing a licensed
site before signing up.
Many players often ask where they can find reliable gaming platforms
with fair odds and smooth payouts. From what I’ve seen, checking
platforms like vn22vip helps users compare features, bonuses,
and overall experience.
Thanks for sharing these insights — they’re helpful for
both beginners and experienced bettors.
Yesterday, while I was at work, my cousin stole my apple ipad and tested to see if it can survive a twenty five foot
drop, just so she can be a youtube sensation. My iPad is
now broken and she has 83 views. I know this is completely off topic but I had to share it with someone!
You really make it seem so easy with your presentation but I find this topic to be really something
which I think I would never understand. It seems too complex and very broad for me.
I’m looking forward for your next post, I’ll try to get the hang of it!
Howdy! I’m at work surfing around your blog from my new iphone 3gs!
Just wanted to say I love reading through your blog and look forward to all your posts!
Carry on the superb work!
Hey! I’m at work surfing around your blog from my new apple iphone!
Just wanted to say I love reading your blog and look forward to all your posts!
Keep up the excellent work!
ГдеБЕНЗ скачать приложение https://www.apkfiles.com/apk-621433/
Howdy! Do you know if they make any plugins to protect against hackers?
I’m kinda paranoid about losing everything I’ve worked hard on. Any recommendations?
This is a very informative post about online casinos and betting platforms.
I especially liked how it explains the importance
of choosing a licensed site before signing up.
Many players often ask where they can find reliable gaming platforms with fair odds and smooth payouts.
From what I’ve seen, checking platforms like vn22vip helps users compare features, bonuses, and overall experience.
Thanks for sharing these insights — they’re helpful for both beginners and experienced bettors.
I don’t even know how I ended up here, but I thought this post was great.
I do not know who you are but certainly you’re going to a famous blogger if you aren’t already 😉
Cheers!
You really make it seem really easy with your presentation but I in finding this matter
to be really one thing which I think I would
by no means understand. It kind of feels too complex and extremely broad
for me. I am having a look ahead on your next post, I’ll attempt to
get the hold of it!
Hello just wanted to give you a brief heads up and let you know a few of the images aren’t loading correctly.
I’m not sure why but I think its a linking issue.
I’ve tried it in two different web browsers and
both show the same outcome.
Good day! Do you know if they make any plugins to help with SEO?
I’m trying to get my blog to rank for some targeted keywords but I’m not seeing very good results.
If you know of any please share. Kudos!
This page definitely has all the information I wanted concerning this subject and didn’t know who to
ask.
As the admin of this web page is working, no question very quickly it will be famous, due to its quality contents.
I was curious if you ever considered changing the layout of your site?
Its very well written; I love what youve got to say.
But maybe you could a little more in the way of content so people could connect with it better.
Youve got an awful lot of text for only having
one or 2 pictures. Maybe you could space it out better?
I just could not go away your site before suggesting
that I extremely loved the usual information a person provide for your visitors?
Is gonna be back regularly in order to check out new posts
my web site Stay Positive
You made some good points there. I checked on the internet to learn more about the issue and found
most individuals will go along with your views on this site.
Very nice post. I just stumbled upon your weblog and wanted
to say that I have really enjoyed surfing around your blog posts.
After all I will be subscribing on your rss feed and I’m hoping you write again soon!
Aw, this was an extremely good post. Taking a few minutes and actual effort to create a great
article… but what can I say… I procrastinate a lot and don’t
seem to get anything done.
It’s hard to find well-informed people in this particular subject, however, you sound like you know what you’re
talking about! Thanks
Its like you read my mind! You seem to know a
lot about this, like you wrote the book in it or something.
I think that you could do with a few pics to drive the message home a little bit, but other than that, this
is fantastic blog. A great read. I will definitely be back.
This blog was… how do you say it? Relevant!! Finally I have found something which helped me.
Appreciate it!
It’s hard to come by educated people on this topic, but you seem
like you know what you’re talking about!
Thanks
Wonderful post! We will be linking to this great content on our site.
Keep up the great writing.
Heⅼⅼo, itѕ fastidious paragraph гegarding media print, ѡe аll Ƅe
familiar with media is a great source of informatіⲟn.
Please let me know if you’re looking for a author for your blog.
You have some really great posts and I think I would be a good
asset. If you ever want to take some of the load off, I’d love to write some articles for your blog in exchange for a link back
to mine. Please blast me an email if interested. Cheers!
you’re actually a excellent webmaster. The web site loading pace is incredible.
It sort of feels that you’re doing any distinctive trick. In addition,
The contents are masterpiece. you’ve performed a excellent task on this subject!
I really like it when folks come together and share views.
Great site, stick with it!
Thanks for sharing your thoughts on Call Girls
in Islamabad. Regards
This info is worth everyone’s attention. When can I find out more?
It is the best time to make some plans for the future and
it’s time to be happy. I have learn this submit and if I may I want to counsel you few
attention-grabbing issues or advice. Maybe you
can write next articles referring to this article. I desire
to learn even more issues about it!
Прощайте бесполезные белые списки на работе — реально работает схема!
Держите в руках Новый протокол — это не просто очередной впн , а прорывной многослойный щит, созданный специально для стран с DPI-фильтрацией .
В его основе используется алгоритм фрагментации , который обманывает любой «умный» фильтр РКН — и даже самые новые методы блокировки проходят мимо .
Что это даёт на практике?
✅ Прорыв каких угодно судебных реестров .
✅ Аннулирование временных сессий — играйте с максимальным битрейтом .
✅ Работа там, где разрешены только «одобренные» сайты — офисные сети открываются на раз-два.
✅ Доступ к любому контенту из любой точки — YouTube, Telegram, Netflix, Discord, Spotify — всё работает даже в самых глухих регионах .
И что важно — провайдер видит только белый шум — никаких логов .
Производительность — без потери пакетов — благодаря оптимизированным маршрутам вы выдаёте минимальную задержку для игр.
Почему именно XrayNet, а не другие?
Потому что бесплатные прокси вычисляются за минуты , а XrayNet подгружает свежие конфиги в реальном времени — поэтому даже если один адрес попал под блокировку — мы зеркалимся за секунды .
Не верьте на слово — жмите по любой из ссылок :
➡️ https://xray1.cc
Скачивайте без смс и лишних телодвижений — и вы забудете о слове «блокировка».
Сохраните этот пост — чтобы товарищи тоже попробовали .
РКН строит стены — мы их сносим .
Ваша свобода в сети начинается здесь
Hey there! Quick question that’s entirely off topic. Do you know how to make your site mobile friendly?
My site looks weird when browsing from my iphone4.
I’m trying to find a theme or plugin that might be able to correct
this problem. If you have any suggestions, please share. Thanks!
It’s going to be ending of mine day, except before ending I am reading this enormous article to improve my
experience.
I was recommended this blog by my cousin. I’m not sure
whether this post is written by him as nobody else know such detailed about my difficulty.
You’re wonderful! Thanks!
Understanding software license agreements is crucial whether you are a developer,
business owner, or end user. These agreements define how software can be used, modified, and distributed.
Two primary types of software licenses are open source and proprietary licenses, each with distinct characteristics and
implications. What is a Software License Agreement? A software license agreement is a legal contract
between the software developer or vendor and the end
user. It outlines the terms under which the user can access, use,
modify, or distribute the software. This agreement protects intellectual
property rights while setting clear expectations for usage.
Open source licenses allow users to freely use,
modify, and distribute software source code.
Common examples include GPL (General Public License), MIT License, and Apache License.
These agreements promote collaboration and transparency by granting users access to
the underlying code with certain conditions like attribution or sharing derivative works under similar terms.
Proprietary licenses restrict usage to specific terms set by the vendor or developer.
Users typically cannot view or modify source code.
Such licenses often limit installation on multiple devices or prohibit
redistribution altogether. Examples include commercial software like Microsoft Windows or Adobe Photoshop which
require purchasing a license for legal use. The major difference lies
in accessibility: open source licenses provide access to
source code allowing customization while proprietary licenses keep source code closed for
control over distribution and modifications.
Open source often encourages community-driven improvements
whereas proprietary focuses on monetization through controlled licensing.
Choosing a license depends on business goals, development needs, budget constraints,
and desired control level over the software.
Open source can reduce costs and foster innovation but might lack dedicated support; proprietary
offers stability backed by vendors but usually comes at higher cost with usage restrictions.
This is really interesting, You are a very skilled blogger.
I have joined your rss feed and look forward to seeking more of your excellent post.
Also, I’ve shared your web site in my social networks!
I have learn some just right stuff here. Certainly price bookmarking for revisiting.
I wonder how a lot attempt you set to make this sort of magnificent informative website.
дикси скачать приложение на андроид https://www.apkfiles.com/apk-621496/
I recently began researching rare coins.
I was looking for numismatic articles, but many resources were missing practical information.
While researching I discovered https://groshi.xyz
The site provides helpful resources about collectible currencies.
Worth checking out if you enjoy coin collecting.
Hi, I do believe this is an excellent web site. I stumbledupon it ;
) I am going to revisit once again since I book-marked it.
Money and freedom is the greatest way to change, may you be rich and continue to guide others.
Very soon this web page will be famous amid all blog viewers, due to it’s fastidious content
I could not resist commenting. Exceptionally well written!
A lot oof good poibts in this article. For apartment operators,
Advanced Collection Bureau works with rental property investors to recoover delinquent resident balances, former tenant
debt, and otjer residential receivables.
It is the best time to make a few plans for the long
run and it’s time to be happy. I’ve read this put up and if I may I
wish to counsel you some attention-grabbing things or tips.
Perhaps you could write next articles relating to this article.
I wish to read even more issues approximately it!
This is a very informative post about online casinos and betting platforms.
I especially liked how it explains the importance of choosing
a licensed site before signing up.
Many players often ask where they can find reliable gaming platforms with fair odds and smooth payouts.
From what I’ve seen, checking platforms like vn22vip helps users
compare features, bonuses, and overall experience.
Thanks for sharing these insights — they’re helpful for both
beginners and experienced bettors.
It’s hard to come by experienced people on this topic,
however, you seem like you know what you’re talking about!
Thanks
I’m gone to tell my little brother, that he should also go to
see this web site on regular basis to obtain updated from newest gossip.
My spouse and I stumbled over here coming from a different
page and thought I should check things out.
I like what I see so now i’m following you. Look forward to going over your web page repeatedly.
My partner and I stumbled over here different web address and thought I may as well check things out.
I like what I see so i am just following you.
Look forward to finding out about your web page for a second time.
Πρόσφατα δοκίμασα να παίζω
πιο εντατικά με τον χώρο των τυχερών στοιχημάτων
και οφείλω να ομολογήσω ότι
έχω πολλές πλατφόρμες. Η
από τις πλέον δημοφιλείς εναλλακτικές
είναι το highfly bet, καθώς μοιάζει να προσφέρει όλα τα εφόδια που αναζητά ένας χρήστης σήμερα.
Διαπίστωσα ότι οι ευκαιρίες στο αθλητικά παραμένουν αρκετά ανταγωνιστικές, ενώ μου άρεσε πολύ ήταν και η συλλογή
στα slots. Επιπλέον, καλό θεωρείται το γεγονός ότι η διεπαφή είναι απλή, ακόμα και για όσους
δεν είναι τόσο εξοικειωμένοι
με την τεχνολογία. Προκύπτει το ερώτημα, ποια θα μπορούσε να
είναι η δική σας άποψη για τη συγκεκριμένη ιστοσελίδα; Είχατε
παίξει καθυστερήσεις στις πληρωμές σας μέχρι
τώρα; Θεωρείτε ότι είναι μια τίμια πρόταση
για σοβαρό στοιχηματισμό; Αναμένω με αγωνία να
ακούσω περαιτέρω άποψη από τους παίκτες
που έχουν πλούσια γνώση στον εν λόγω καζίνο.
Hey! This is my 1st comment here so I just wanted to give
a quick shout out and tell you I really enjoy reading your posts.
Can you recommend any other blogs/websites/forums that cover the same topics?
Thanks a ton!
This is a very informative post about online
casinos and betting platforms. I especially liked how it explains the
importance of choosing a licensed site before signing up.
Many players often ask where they can find reliable
gaming platforms with fair odds and smooth
payouts. From what I’ve seen, checking platforms like vn22vip helps
users compare features, bonuses, and overall experience.
Thanks for sharing these insights — they’re helpful for both beginners
and experienced bettors.
Grüß euch, ich persönlich befasse mich eingehend mit unterschiedlichen Anbietern in der Online-Casino-Welt.
Mir dabei aufgegangen, dass unglaublich schwer geworden ist, wirklich gute Anbieter von unseriösen unterscheiden.
Neulich stieß ich über spinogambino, wobei mich positiv überrascht hat.
Die technische Aufmachung wirkt wirklich reibungslos, vor allem wenn man mobil zockt.
Ich persönlich habe etliche Slots ausprobiert und fand die Ladezeiten wirklich stark.
Eventuell dieses ein solider Wegweiser für, die gerade nach
etwas Neues wollen. Könnt ihr eventuell schon selbst eigene Eindrücke
dort gemacht? Mich würde besonders brennend, wie ihr
Transaktionen so laufen? Glaubt ihr eigentlich, dass bei diesartigen Seiten überhaupt dauerhaft einen Gewinn erzielen könnte?
Ich bin mal sehr auf eure Rückmeldungen neugierig!
Asking questions are truly good thing if you are not understanding something totally, but
this piece of writing provides nice understanding yet.
This can cause issues with the earlier linking. URL slugs cannot affect SEO sufficiently to warrant concern. Just remember to make use of this tip in the future.
SSL Certificates: Google values websites that include the HTTPS protocol.
Squarespace provides free SSL certificates to all customers, and you
may enjoy a secure connection on all pages.
No tech setup is important. Mobile-friendly: All CMS platforms offer themes which might be cellular-friendly and responsive to all system sizes, and so do the Squarespace
themes. This is very vital for Google, particularly after the launch of the cellular-first
platform. XML Sitemaps: I’ve noticed fairly a
number of websites with incorrectly arrange sitemaps.
Squarespace sites include an automatic XML sitemap that includes all of
your page URLs and pictures, ready for SEO-pleasant indexing.
For many who aren’t seeking to do it themselves,
discover an SEO agency that has the trade expertise and affords exclusivity (a limited non-compete).
An agency that focuses on your vertical ensures they know sufficient
about your trade to use your finances effectively. And in the event that
they will give you a specific market or geographic exclusivity, you recognize they imply business.
It’s going to little question cost extra, nevertheless it makes no sense for
them to be working in your competitors as effectively!
You are so cool! I don’t suppose I’ve truly read
anything like this before. So wonderful to discover someone with
some original thoughts on this subject. Really..
thank you for starting this up. This website is something that is needed on the web, someone with a little
originality!
Also visit my site … จัดเก็บประหยัดที่
If you would like to take a good deal from this post then you have to apply such methods to
your won weblog.
I will immediately grasp your rss as I can not to find your e-mail subscription hyperlink or e-newsletter service.
Do you have any? Please allow me recognise so that I may just subscribe.
Thanks.
Today, I went to the beachfront with my kids. I found a sea shell and gave it to my 4 year old daughter and said “You can hear the ocean if you put this to your ear.” She put the shell to her ear and screamed.
There was a hermit crab inside and it pinched her
ear. She never wants to go back! LoL I know this is completely off topic but I had to tell someone!
This is a very informative post about online casinos and betting platforms.
I especially liked how it explains the importance of
choosing a trusted site before signing up.
Many players often ask where they can find reliable gaming platforms with fair odds and smooth payouts.
From what I’ve seen, checking platforms like vn22vip helps users compare features, bonuses, and overall experience.
Thanks for sharing these insights — they’re helpful for both beginners and experienced bettors.
Hello, i think that i saw you visited my site thus i came to return the
desire?.I’m attempting to find things to improve my web site!I assume its
good enough to use some of your ideas!!
It’s an amazing paragraph for all the web people; they will take advantage from
it I am sure.
Honestly speaking, I have spent time trying several casinos along with
my general take appears to be that finding
a reliable operator definitely shifts everything. It is not just focused on the massive jackpots, however more involving the actual
fluid feel once we really spin. I these days that there are some truly decent choices where one can verify Aviator how to play as
well as witness what works perfectly for one’s specific routine.
Would the community actually believe like slot range is vital much more compared to those signup promos?
I sometimes the situation feels really very complex,
so then I’m interested to discover y’all’s real opinions about
what factors folks prioritize top.
This article provides clear idea for the new users of blogging, that actually how to do running a blog.
Excellent blog! Do you have any suggestions for aspiring writers?
I’m planning to start my own blog soon but I’m a little lost on everything.
Would you suggest starting with a free platform like WordPress
or go for a paid option? There are so many options out there
that I’m totally overwhelmed .. Any ideas? Appreciate it!
Hello! Quick question that’s totally off topic.
Do you know how to make your site mobile friendly?
My site looks weird when browsing from my iphone 4.
I’m trying to find a template or plugin that might be able to
resolve this issue. If you have any recommendations, please share.
Thank you!
Hi, I do believe this is an excellent blog. I stumbledupon it ;
) I will revisit yet again since I bookmarked it. Money and freedom
is the greatest way to change, may you be rich and continue to help others.
Useful information. Fortunate me I found your web site by chance, and
I am surprised why this accident didn’t came about in advance!
I bookmarked it.
Hi there! This is my first comment here so I just wanted to
give a quick shout out and tell you I genuinely enjoy reading through your
blog posts. Can you suggest any other blogs/websites/forums that deal with the same subjects?
Thanks!
Magnificent site. Lots of useful information here.
I’m sending it to several pals ans also sharing in delicious.
And naturally, thanks on your sweat!
Good post. I’m facing some of these issues as well..
Please let me know if you’re looking for a article writer
for your site. You have some really good articles and I think I would be a good asset.
If you ever want to take some of the load off, I’d love to write some articles for your blog in exchange
for a link back to mine. Please send me an email if interested.
Thank you!
Hi, i think that i saw you visited my website thus i came to
“return the favor”.I’m attempting to find things to enhance my web site!I suppose its ok to use
some of your ideas!!
I am in fact grateful to the holder of this website who has shared this wonderful article
at at this time.
bookmarked!!, I really like your site!
Wow that was odd. I just wrote an very long comment but after
I clicked submit my comment didn’t show up. Grrrr… well I’m not writing all that over again. Anyhow, just wanted to say wonderful blog!
Hey there! I know this is somewhat off topic but I was wondering which blog platform are you using for this
site? I’m getting fed up of WordPress because I’ve had issues with
hackers and I’m looking at alternatives for another platform.
I would be great if you could point me in the direction of a
good platform.
Why viewers still make use of to read news papers when in this technological globe everything is available on net?
I’m amazed, I must say. Rarely do I come across a blog that’s both educative
and amusing, and without a doubt, you have hit the nail on the head.
The problem is something which too few people are speaking intelligently about.
I am very happy I came across this in my search for something
relating to this.
Hi to all, how is everything, I think every one
is getting more from this website, and your views are nice in support of
new users.
I am genuinely glad to glance at this web site posts which carries tons of
valuable facts, thanks for providing these statistics.
Hey there are using WordPress for your blog platform?
I’m new to the blog world but I’m trying to get started and create my own. Do you need any html coding expertise to make
your own blog? Any help would be really appreciated!
I read this post fully on the topic of the
difference of latest and earlier technologies, it’s amazing article.
I have read so many posts on the topic of the blogger lovers however this piece of writing is
actually a good post, keep it up.
I was suggested this website by way of my cousin. I am now
not positive whether or not this post is written by means of
him as no one else realize such detailed
approximately my trouble. You are amazing!
Thank you!
Take your mining operation further with Oromineral’s comprehensive mineral processing
resources and engineering solutions. Find practical guides on magnetic
separation, iron ore beneficiation, copper processing costs, zinc electrolysis, industrial separation methods,
advanced WHIMS technology, and the world’s leading mineral processing companies
and equipment manufacturers. Whether you’re building a new processing
plant, expanding production capacity, or searching for reliable mining equipment, Oromineral provides industry-focused information, technical
expertise, and innovative solutions that support higher recovery, lower operating costs, and sustainable mining performance.
Good post. I learn something new and challenging on blogs I
stumbleupon everyday. It’s always useful to read articles from other
writers and practice a little something from other
sites.
What a material of un-ambiguity and preserveness of precious know-how concerning unpredicted feelings.
I was suggested this blog by my cousin. I’m not sure whether
this post is written by him as nobody else know such detailed about my difficulty.
You are wonderful! Thanks!
You actually make it seem really easy along with your presentation however I in finding this topic to be actually something that I feel I
might by no means understand. It seems too
complicated and extremely vast for me. I am having a look forward to
your next put up, I will try to get the cling of it!
This is a very informative post about online casinos and betting platforms.
I especially liked how it explains the importance of choosing a secure site before signing up.
Many players often ask where they can find reliable gaming platforms with fair odds and smooth payouts.
From what I’ve seen, checking platforms like vn22vip helps users compare features, bonuses, and overall experience.
Thanks for sharing these insights — they’re helpful for both beginners and experienced bettors.
Very energetic article, I liked that bit. Will there be a part 2?
Every weekend i used to pay a visit this web site, because i
want enjoyment, for the reason that this this site conations actually nice funny stuff too.
Hello, I wish for to subscribe for this website to obtain most up-to-date updates, thus where can i do
it please help.
Unquestionably believe that which you stated.
Your favorite reason seemed to be on the net
the easiest thing to be aware of. I say to you, I definitely get
irked while people consider worries that they plainly don’t know about.
You managed to hit the nail upon the top and also defined out the whole thing without having side-effects , people could take a signal.
Will probably be back to get more. Thanks
Helpful write-up here — appreciate the clarity.
I have been working through similar questions for ownership decisions and this cleared up several
questions I had. What really resonated was the honest take on what owners really need.
Most pieces on vehicle decisions skip the practical reality — good to read something that goes
past the obvious tips. Definitely coming back to this when I finalise
my own decisions. Genuinely grateful for the time you spent
on this.
This article will help the internet visitors for setting up new website or even a blog from start
to end.
My brother suggested I might like this website. He was totally right.
This post truly made my day. You can not imagine just how much time I had spent for this info!
Thanks!
Good day! This is my first visit to your blog!
We are a group of volunteers and starting a new project in a community in the same niche.
Your blog provided us useful information to work on. You have done a outstanding job!
You really make it appear so easy together with your presentation but I find this matter to be
actually one thing that I think I would by no means understand.
It sort of feels too complex and extremely wide for me.
I am taking a look forward for your next post, I will
attempt to get the cling of it!
This is a very informative post about online casinos and betting platforms.
I especially liked how it explains the importance of choosing a licensed site before
signing up.
Many players often ask where they can find reliable gaming platforms with fair odds and smooth payouts.
From what I’ve seen, checking platforms like vn22vip helps users compare features, bonuses, and overall experience.
Thanks for sharing these insights — they’re
helpful for both beginners and experienced bettors.
continuously i used to read smaller articles or reviews which also clear their motive, and that is
also happening with this post which I am reading at this place.
I blog often and I truly thank you for your information. This great article
has truly peaked my interest. I’m going to book mark
your blog and keep checking for new information about once a week.
I subscribed to your RSS feed as well.
Wonderful blog! I found it while surfing around on Yahoo News.
Do you have any tips on how to get listed in Yahoo News?
I’ve been trying for a while but I never seem to
get there! Appreciate it
Do you have a spam problem on this site; I also am a blogger, and I was wanting to know your situation; many of us have created some nice procedures and
we are looking to swap techniques with other folks, be sure to shoot
me an e-mail if interested.
This is a very informative post about online casinos and betting platforms.
I especially liked how it explains the importance of choosing a secure site before signing up.
Many players often ask where they can find reliable gaming platforms with
fair odds and smooth payouts. From what I’ve seen, checking platforms
like vn22vip helps users compare features, bonuses, and overall experience.
Thanks for sharing these insights — they’re helpful for both beginners and experienced
bettors.
Where you can get viagra tablets in Tamil Nadu
It’s impressive that you are getting thoughts from this piece of writing
as well as from our dialogue made here.
This is a very informative post about online casinos and betting
platforms. I especially liked how it explains the importance of choosing a trusted site before signing up.
Many players often ask where they can find reliable gaming platforms with fair odds and smooth payouts.
From what I’ve seen, checking platforms like vn22vip helps users compare features, bonuses, and overall experience.
Thanks for sharing these insights — they’re helpful for
both beginners and experienced bettors.
Fastidious respond in return of this query with real arguments and
explaining everything about that.
My coder is trying to convince me to move to .net from PHP.
I have always disliked the idea because of the costs.
But he’s tryiong none the less. I’ve been using Movable-type on various websites
for about a year and am worried about switching to
another platform. I have heard fantastic things about blogengine.net.
Is there a way I can import all my wordpress posts into it?
Any help would be greatly appreciated!
I used to be able to find good info from your blog articles.
Howdy! This article couldn’t be written much better!
Reading through this post reminds me of my previous roommate!
He continually kept talking about this. I’ll send this article to him.
Fairly certain he’ll have a great read. Thanks for
sharing!
Awesome! Its genuinely awesome piece of writing, I have got much clear idea regarding
from this paragraph.
Thanks for the auspicious writeup. It in reality used to be a leisure account it.
Look complicated to more introduced agreeable from you!
By the way, how can we keep up a correspondence?
Hey there! I know this is kind of off-topic
however I had to ask. Does building a well-established blog such as
yours require a massive amount work? I’m completely new to blogging but I do write in my journal everyday.
I’d like to start a blog so I can share my own experience and thoughts
online. Please let me know if you have any ideas or
tips for brand new aspiring blog owners. Thankyou!
You really make it seem so easy with your presentation but I
find this topic to be actually something which I think I would never understand.
It seems too complex and extremely broad for me.
I’m looking forward for your next post, I will try to get the hang
of it!
This is very interesting, You’re a very skilled blogger.
I’ve joined your feed and look forward to seeking more of your fantastic post.
Also, I have shared your site in my social
networks!
This is a very informative post about online casinos and betting platforms.
I especially liked how it explains the importance
of choosing a secure site before signing up.
Many players often ask where they can find reliable gaming platforms with
fair odds and smooth payouts. From what I’ve seen, checking platforms like vn22vip helps users compare
features, bonuses, and overall experience.
Thanks for sharing these insights — they’re helpful for both
beginners and experienced bettors.
This article will help the internet people for setting up new webpage or even a weblog from
start to end.
Upgrade your automation system with premium linear actuators from Sanxing Actuator.
We manufacture powerful electric linear actuators, durable linear actuator 12v models, precision linear
electric actuator systems, compact small linear actuator units, reliable high speed linear
actuator solutions, intelligent linear actuator controller products, and customized motion control equipment for industrial applications.
Our factory focuses on consistent quality, precision manufacturing, energy-efficient performance, and long-lasting durability.
With OEM & ODM production, competitive wholesale pricing,
professional technical support, and fast international shipping, Sanxing helps businesses source dependable actuator
solutions that improve productivity, reduce maintenance costs, and
deliver reliable linear motion performance across multiple industries.
Today, I went to the beach with my kids. I found a sea shell and gave it to my 4 year old daughter
and said “You can hear the ocean if you put this to your ear.” She placed the shell to her ear and screamed.
There was a hermit crab inside and it pinched her ear.
She never wants to go back! LoL I know this is entirely off topic but I had to tell someone! https://lga2011narrow.blogspot.com
Upgrade your drinking water with Puflow’s complete range of advanced
water filtration solutions. Shop NSF-certified countertop reverse osmosis systems, high-flow RO systems, portable water filters
for travel, and non-electric filtration systems perfect for off-grid and emergency
situations. Explore educational resources covering reverse osmosis drinking water benefits, microplastic
filtration, under-sink RO installation, and expert-tested water filtration recommendations.
Puflow combines innovative engineering, premium filtration technology,
and dependable performance to help families, travelers, and outdoor enthusiasts enjoy fresh, clean, contaminant-reduced water every day.
The Aviator-style and slot selection at crazytimes is honestly broader than I expected for a smaller IT-friendly
casino. Good shout on the live blackjack tables
too.
This is a very informative post about online casinos and betting
platforms. I especially liked how it explains the importance
of choosing a secure site before signing up.
Many players often ask where they can find reliable gaming platforms
with fair odds and smooth payouts. From what
I’ve seen, checking platforms like vn22vip helps users
compare features, bonuses, and overall experience.
Thanks for sharing these insights — they’re helpful for both beginners and experienced bettors.
대전출장안마 찾는 분을 위한 방문 웰니스 케어 예약 안내바쁜 일상 속 피로가
쌓였지만 이동 시간이 부담스럽다면, 원하는 장소에서 편안하게 받을 수 있는 대전
방문형 웰니스 케어를 이용해보세요.
This is a very informative post about online casinos and betting
platforms. I especially liked how it explains the importance of choosing a trusted
site before signing up.
Many players often ask where they can find reliable gaming platforms with fair odds and smooth payouts.
From what I’ve seen, checking platforms like vn22vip
helps users compare features, bonuses, and overall
experience.
Thanks for sharing these insights — they’re helpful for both beginners and experienced bettors.
Nice share! Ulasan ini sangat membantu bagi audiens yang membutuhkan gerbang masuk yang stabil.
Saat ini penggunaan **WIN1131 Link Alternatif Resmi 2026** memang menjadi
solusi terbaik untuk keamanan **Login** dan kemudahan **Daftar**.
Sebagai penyedia **Slot Online Terbaru**, stabilitas akses adalah yang paling
utama. Terima kasih sudah berbagi link informatif ini!
Kunjungi WIN1131 Terbaru
Pretty great post. I just stumbled upon your blog and wanted
to say that I have really enjoyed browsing your blog
posts. In any case I will be subscribing for your feed and I am hoping you write again soon!
Hey I know this is off topic but I was wondering if you knew
of any widgets I could add to my blog that automatically tweet my newest
twitter updates. I’ve been looking for a plug-in like this for quite some time and was hoping
maybe you would have some experience with something like this.
Please let me know if you run into anything. I truly enjoy reading your
blog and I look forward to your new updates.
ГдеБЕНЗ удобный Telegram бот https://telegram.botlist.ru/14346-gdebenz-bot.html
What’s up everyone, it’s my first visit at this site, and piece
of writing is in fact fruitful in favor of me, keep up posting these posts.


376 Comments